Card draw simulator
| Derived from |
|---|
| None. Self-made deck here. |
| Inspiration for |
|---|
| None yet |
VinnyB · 225

tl;dr:
- Strong fighter
- Reliably enable Transfiguration for a specific non- teammate to YOMO
- Enjoy drawing a million cards in the process
Overview:
-
Draw: Wildly fast potential, thanks to the many self-damaging cards. The fact that it's also selective draw smooths out every aspect of your game, letting you constantly adjust the balance of [what you have] vs [what you need].
-
Fighting: Contrary to what your -honed instincts are probably telling you, four arcane "guns" is plenty. Odd-health enemies can be finished off with 1-dmg pings from your whackin sticks, or just by -empowered basic punches (not necessarily just from you).
- Cosmic Flame (5) is our shiny new all-in-one combat solution: endless 2-dmg attacks, plus a pile of PRN 1-dmg-pings. Even with occasional deterioration, your sig can keep it topped off pretty effortlessly.
- If you've tired of the CF5 crutch, Azure Flame (3) is a great-but-not-broken alternative baseline weapon. Without the built-in ping mechanism, you'll want to make upgrading Blood Curse to L3 a higher priority.
-
Clueing: This build intentionally leans completely into fighting, to leave space for your trans conspirator to go all-in on clueing. If they want to flex, though, or if the broader team is already overly fighty, stretching Marie into some clueing is very easy. Rite of Seeking and/or DTTF can be slotted in pretty self-explanatorily. Summoned Servitor, Living Ink, Winging It (Versatiled), and maybe Will of the Cosmos can also be strong options in various circumstances; more in the Upgrades section below.
-
Healing: Drain Essence and Blood Ward are the primary ways to bail out your bloodboat (and both are reshufflable), potentially 8 healing/loop. A large part of piloting her is finding a balance between self-harm and self-healing.
- Remember that you don't actually have to be constantly digging; if you've got stuff to play and tools to work with, it's okay to take a break (briefly!) from stabbing yourself.
- Digging out a transfig asap is pretty important, though, so ideally you can just go ham initially and lean on your teammates to help patch you up a bit. Strong options in other classes include bandage-scavenging, Medical Texts (2), and Hallowed Mirror. Hallowed Chalice can also be a strong option for folks who have a bunch of extra , i.e. . (Note that your weakness prevents healing from being done by you, but not to you.)
-
Weaknesses: Looping 3-5 times per scenario means the impact of any given weakness is going to be massively magnified. Some ways to mitigate that include:
- Trap it outside your deck, perhaps with assistance from /, either directly in play or inside your own black box. Mainly only applies to enemies, or some asset weaknesses (that can basically trap themselves). Nasty -clearable treacheries you can beg a to FMO (by way of STTP). There's also a convoluted Black Market trick which can sometimes trap any weakness outside the game.
- Stagger clearing in-play treacheries until immediately post-reshuffle, so that you only have to deal with it every other loop.
- Slightly pad the deck, to allow you room for more productive draws per loop. If you end up pulling something particularly painful as your RBW, consider immediately Collectoring. (Versatile is also good, but is allowed to wait until midcampaign.) More in the Upgrades section below.
-
Flexibility: Having 4 skills (per loop!) means you can be remarkably capable at doing pretty much anything, or enabling teammates.
Some notes on specific cards:
-
Transfiguration: Try to dig one out by round 5 at the latest. (Scenario 1 may take as late as round 7, since you only have the one copy.) Note that 1/scenario max is groupwide. Even after being rendered blank, this has surprisingly great icons.
-
Drain Essence: Usually worth pushing up to "all-but-" skill value levels. Can theoretically hit aloofs directly, but will likely need supplemental aloof-pingage from CF5, Blood Curse (3), and/or Servitor-punching.
-
Sign of Xelotaph: Perfectly suited to this level of churn, this is strong teamwide protection on Hard+. On Standard-, though, the spooky symbols are toothless enough to not need protecting against. Earthly Serenity and/or Rite of Seeking are solid alternatives for that 2nd arcane slot. For 3+ , I would lean towards the more interesting Summoned Servitor (more in Upgrades).
-
Favor of Baalshandor: Incredibly strong tempo in the first few rounds; worth keeping around even if you end up replacing Sign of Xelotaph with something non-Favorable.
-
Captivating Performance: Surprisingly easy to squeeze an extra out of, since many turns will involve making 2 attacks (via your assets). Throw in one more type (usually Engage, Move, or Play) and CapPer should be able to spit out something (ideally a Move or Play, or perhaps a stray Investigate; worst case it's still a free Draw or Resource action). And remember that it's Favorable!
-
Versatile'd Winging It: Clueing flexiness and weakness density mitigation rolled into one. Pull a Smoking Pipe into the free space, to maintain your trans-locating speed. You could even do this twice, probably dipping into the neutral cantrips.
-
Hallowed Chalice: Another primarily-YOMOable option, since the is much more likely to have to spare.
Other upgrade options:
-
Summoned Servitor: For an initial investment of 4 XP (1 XP into the Wings upgrade + 3 XP for Charisma), you get an arcane-slotted pseudo-Pathfinder (with some important caveats, elaborated below). From there the other 1-XP bells and whistles can flesh it out as a support tool as needed (to directly punch Whippoorwills, evade enemies directly off of teammates, etc). And once it's picked up a few new skills, the 5-XP double-action upgrade lets it move in and do a thing (or be left at a place to sit and do two things, perhaps to support a teammate while you yourself move on). Important limitations to keep in mind:
- The Servitor can only be ridden into already-revealed locations, so you'll need to make a habit of delegating map-opening to your teammates (Loners?) if you want to reliably get free "move actions" out of it.
- It moves pretty slowly, and can't really utilize any external movement effects/options (like say walking through Gates). If you need to outpace it then it may be better to just leave it somewhere to plug away at clues, or harass enemies remotely.
- Movement is one of the higher-value actions that Captivating Performance can provide. If you're planning on regularly skating around on the Servitor, it will probably mean getting less value out of CapPer (since you'll likely resort to basic draw/resource actions more often)
- It's unique, so it can't be played over by a 2nd copy of itself. If you want to reposition it, you'll need to push it out via slot-overfilling, or (if you've purchased the 3-health upgrade) by having it soak 3 damage.
-
Living Ink: If you're doing a fair amount of investigating and have XP to sink into this, it can be pushed up to a static +2 & (& ?).
-
Spiritual Echo: Effectively allows you to pay 1$ every turn in order to (preemptively) purchase a very specific (by playing it immediately before Spell-shooting).
-
Purifying Corruption: Theoretically a self-contained healing/harming/protection package (and can even be Favor'd out, since it's a Ritual). On Hard I got the sense that it tipped over into producing more problems than it solved, but it's also possible I just didn't quite master its potential in my testing. Maybe worth toying with on Standard?
-
Eldritch Brand, for your Cosmic Flame (5): Very expensive (15 XP total) and boring, but having CF5 out from turn 1 is undeniably effective. It would then obsolete the other guns, possibly the hand weapons, and also possibly Favor of Baalshandor. A single Enraptured (2) or Call the Beyond could then help keep it topped off. Just be aware of and prepare to play around any relevant asset hate!
-
Blood of Thoth (via Relic Hunter) plus Blood Pact (3) (so 6 XP total): You can technically use both of BP(3)'s abilities during literally any test, regardless of skill type and regardless of performing investigator. So e.g.: witching hour rolls around -> the team performs 4 tests that round -> you accrue 8 offerings -> BoT can disgorge a free for the next 4 rounds. In other words, even with no real engagement with doomplay, this turns into Carson-on-a-stick (though note that the rations you store will approximately scale with player count). (You do actually have a little doomplay, which can probably pad out a couple extra s' worth of offerings over the course of the game.) Mainly not included in this list because I suspect many folks will likely look askance at using BP(3) this way.
-
Sin-Eater (another 6 XP): Enables BP to theoretically be used at any time (in moderation), lets Renfield print $ even faster, and smooths out the offering-rationing between witching hours. (Note that simply moving a doom between BP and SE earns another thothering.) May end disastrously for the entire team if you aren't mindful of looming AE-analogues!
-
Bend Blood: Expensive but potentially interesting option, whose use can be magnified by Dagger-reshuffling. Note that the attack-immunity even applies to Elites.
-
Example campaign starter:
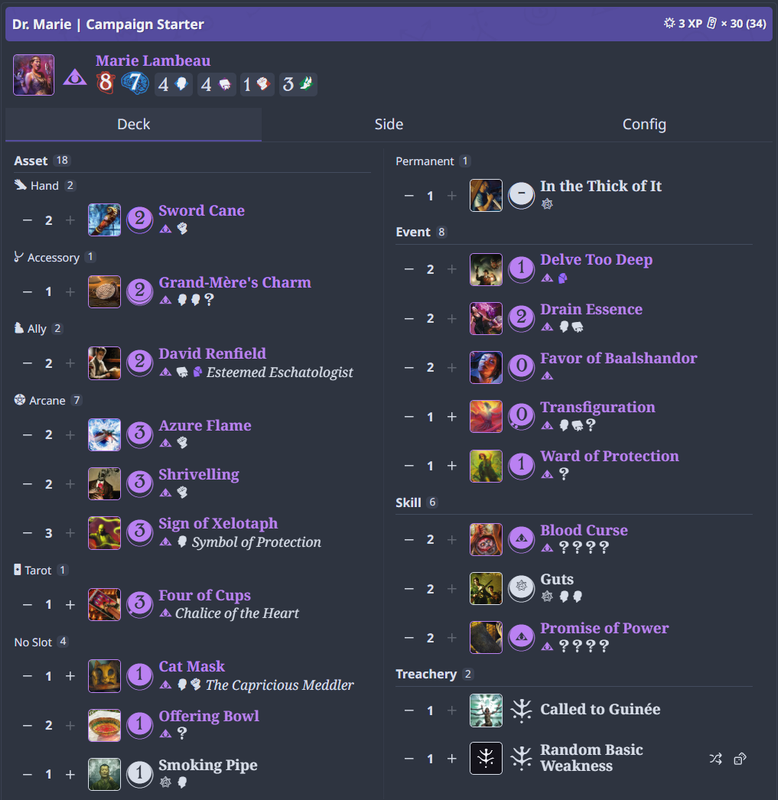 (Link to this starter deck on arkham.build / arkhamdb)
Example upgrade path:
| Cost | Total | ||||
|---|---|---|---|---|---|
| (In the Thick of It) | → | Transfiguration •• | 2 XP | 2 XP | |
| (In the Thick of It) | → | Four of Cups • | 1 XP | 3 XP | |
| Smoking Pipe | → | Transfiguration •• | 2 XP | 5 XP | |
| Shrivelling | → | Cosmic Flame ••••• | 5 XP | 10 XP | |
| Guts | → | Blood Ward •• | 2 XP | 12 XP | |
| Guts | → | Captivating Performance ••• | 3 XP | 15 XP | |
| Sword Cane | → | Ritual Dagger ••• | 3 XP | 18 XP | |
| Delve Too Deep | → | Blood Ward •• | 2 XP | 20 XP | |
| + | Versatile •• + L0s | 2 XP | 22 XP | ||
| + | Charisma ••• | 3 XP | 25 XP | ||
| Ward of Protection | → | Ward of Protection •• | 2 XP | 27 XP |